Sunday, March 30, 2014

What Every Aspiring Photographer Should Know

The following is a blog from a friend of mine on Deviant Art.  Just thought I'd share it with you.  
Here is the link to the blog: http://www.cjmentoring.com/#!What-Every-Aspiring-Photographer-Should-KnowStill/cja0/3

These are my thoughts, nothing more and nothing less.

I get asked all the time, during workshops, in e-mails, in private messages, what words of wisdom I would give to a new and aspiring photographer. 

Here’s my answer. 
  • Style is a voice, not a prop or an action. If you can buy it, borrow it, download it, or steal it, it is not a style. Don’t look outward for your style; look inward.
  • Know your stuff. Luck is a nice thing, but a terrifying thing to rely on. It’s like money; you only have it when you don’t need it.
  • Never apologize for your own sense of beauty. Nobody can tell you what you should love. Do what you do brazenly and unapologetically. You cannot build your sense of aesthetics on a consensus.
  • Say no. Say it often. It may be difficult, but you owe it to yourself and your clients. Turn down jobs that don’t fit you, say no to overbooking yourself. You are no good to anyone when you’re stressed and anxious.
  • Learn to say “I’m a photographer” out loud with a straight face. If you can’t say it and believe it, you can’t expect anyone else to, either.
  • You cannot specialize in everything.
  • You don’t have to go into business just because people tell you you should! And you don’t have to be full time and making an executive income to be successful. If you decide you want to be in business, set your limits before you begin.
  • Know your style before you hang out your shingle. If you don’t, your clients will dictate your style to you. That makes you nothing more than a picture taker. Changing your style later will force you to start all over again, and that’s tough.
  • Accept critique, but don’t apply it blindly. Just because someone said it does not make it so. Critiques are opinions, nothing more. Consider the advice, consider the perspective of the advice giver, consider your style and what you want to convey in your work. Implement only what makes sense to implement. That doesn’t not make you ungrateful, it makes you independent.
  • Leave room for yourself to grow and evolve. It may seem like a good idea to call your business “Precious Chubby Tootsies”….but what happens when you decide you love to photograph seniors? Or boudoir?
  • Remember that if your work looks like everyone else’s, there’s no reason for a client to book you instead of someone else. Unless you’re cheaper. And nobody wants to be known as “the cheaper photographer."
  • Gimmicks and merchandise will come and go, but honest photography is never outdated.
  • It’s easier to focus on buying that next piece of equipment than it is to accept that you should be able to create great work with what you've got. Buying stuff is a convenient and expensive distraction. You need a decent camera, a decent lens, and a light meter. Until you can use those tools consistently and masterfully, don’t spend another dime. Spend money on equipment ONLY when you've outgrown your current equipment and you’re being limited by it. There are no magic bullets.
  • Learn that people photography is about people, not about photography. Great portraits are a side effect of a strong human connection.
  • Never forget why you started taking pictures in the first place. Excellent technique is a great tool, but a terrible end product. The best thing your technique can do is not call attention to itself. Never let your technique upstage your subject.
  • Never compare your journey with someone else’s. It’s a marathon with no finish line. Someone else may start out faster than you, may seem to progress more quickly than you, but every runner has his own pace. Your journey is your journey, not a competition. You will never “arrive”. No one ever does.
  • Embrace frustration. It pushes you to learn and grow, broadens your horizons, and lights a fire under you when your work has gone cold. Nothing is more dangerous to an artist than complacency.

 - CJ

Saturday, March 29, 2014

Abstract Expressionism Assignment due Friday April 4th at 9 am


Create 6 (six) 8x12 images employing the spirit of abstract impressionism.

Due: Friday, April 4, 2014 at 9 a.m. on your blog.

You do not have to print the images at this time.  You may want to print at a later date for your final 20 on the final exam.

What: Bring the files of all images on your hard drive to class.


If you have the images posted on the blog by 9am you will receive a 100. If you do not have the images posted on the blog by 9am you will receive a 0.

Remember there are no late assignments accepted or extra credit assignments provided in this class.

You might want to read this article: 

Aaron Siskind: Ideas in Photography
By Ronald J. Hill
Published by: Princeton University Art Museum

Stable URL: http://www.jstor.org/stable/3774626


Wednesday, March 26, 2014

What to bring to class on Friday....

1.  Your alphabet images.  Large file size please, not the images you sized for the web.  Please download these onto my computer as soon as you get to class.

2.  Your camera.  We are going to go downtown and have a demonstration on abstract impressionistic photography.

3.  Any images you want help on correcting in Photoshop from the mid-term in order to re-print for the final 20.

4.  Your files from the photo montage assignment.

When you get to class will you please pull up your blog sites for everyone to see your work?

Can't wait to see what you have produced over the week.

Ginger

Saturday, March 22, 2014

Useful links for creating a Maggie Taylor...ish image

Great tutorial on creating layers for a beginner: 
https://www.youtube.com/watch?v=qr00RUwC5f0

How to combine two images seamlessly in photoshop:
https://www.youtube.com/watch?v=17BxDq8sOjk

To layer in camera while taking photographs:
https://www.youtube.com/watch?v=taJzcMItcEk

How to composite images using photoshop in Lynda.com
https://www.youtube.com/watch?v=MmwrWCMdYqI

Links to useful examples for photo montage assignments

Example of how to create a levitation image: https://www.youtube.com/watch?v=dgzdiiC8_pc

How to automatically create a photomontage:  https://www.youtube.com/watch?v=TGqCf8IEFKI

Examples of how to create a multiple me image:  
https://www.youtube.com/watch?v=xVP1GkJvJfU
https://www.youtube.com/watch?v=PAdubp4_fF4


Step-by-step how to create a levitation image

  1. Set up a camera on a tripod, don't bump into it or move it during your shooting. 
  2. Take  a picture of the scene without the subject in it.
  3. Use a stool, ladder, table, etc. to levitate yourself (or someone else) from a surface and take a picture of yourself.
  4. In Photoshop, open the photos. a) Choose the photograph without you in it as the main background b) Bring the image in of you levitating as a layer. d) Line the images up so they match. e) Erase away the stool, ladder, table, etc, to create the illusion of levitation.
  5. Flatten the layers.
  6. Crop the image.
  7. Save the image as a tiff at 300 dpi. to print.
  8. Save the image again as a jpeg at 73-100 dpi to upload on your blog.


Step-by-step how to create a multiple me image


  1. Set up a camera on a tripod, don't bump into it or move it during your shooting. 
  2. Take multiple pictures of yourself in different locations in the frame. You can ask a friend to take the picture, or you can set the timer.
  3. In Photoshop, open the photos. a) Choose one photo to be the main background b) In the other photos, use the selection tool to cut out yourself from the other photos, it's okay to be sloppy because the backgrounds are the same in all the photos c) Paste all the images into one photo you chose in step 3a, each cut out of you should be on a different layer d) Line yourself up so it looks natural.
  4. Flatten the layers.
  5. Crop the image.
  6. Save the image as a tiff at 300 dpi. to print
  7. Save the image again as a jpeg at 75-100 dpi to upload to your blog.


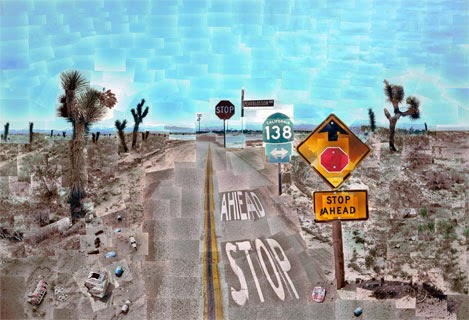
Step-by-step David Hockney

The best way to shoot a David Hockneyish image(s) is to
use a medium focal length lens 50-100 mm, stand in one place,

use Program mode or set the camera to manual so the exposure does not change and photograph the scene.
You might start at the bottom left - sweep right then move up and sweep left - and continue until the entire object is captured. Be sure to overlap your images.
Shoot about 24-36 images.
Download your images onto your computer or jump drive or….take your card to Wal Mart and have 4x6 prints made.

Once pictures are uploaded:

1-Create a new document in Photoshop (file>new) Make it 10000x10000 pixels. This will give you a very large blank canvas to add your photos to.

2-Next, open your photos in Photoshop. (You may want to only open the ones you think you may actually be using)

3-Use the Move Tool to drag each photo on to the blank canvas. Begin piecing them together as you add them in (keep them as their own layers so you can make adjustments to each image if needed).

4-Once photos are laid-out use the Crop Tool to crop the excess white canvas around artwork (do not crop any of the pictures!)

5-Edit each layer (using Image Adjustments) so that all the photos have good contrast and are all matching in colors. This may take a long time as you will need to do this to all your layers.

6-When you are done print your image!

Photo Montage Assignment due Friday, March 28 at 9 am

Assignment #6: 

Create 4 (four) 8x12 images using a photo montage technique.

You can do 4 of David Hockney, 4 Multiple Me, 4 Levitation, or 4 Maggie Taylor inspired photographs.  If you wish you can do a combination of all four.  Your choice.

Due: Friday, March 28, 2014 at 9 a.m. uploaded on your blog.  You do not have to print the images at this time.  You may want to print one or all of the images at a later date for your final 20 on the final exam.

What: Bring the files of all images on your hard drive to class. We will be using these files for the lab exercise in Photoshop, to print if you wish and for your Blog.

If you have the images posted on the blog by 9am you will receive a 100. If you do not have the images posted on the blog by 9am you will receive a 0.

Remember there are no late assignments accepted or extra credit assignments provided in this class.

We will take a look at your blogs on Friday, talk about what was easy or hard, have the next lecture and then have lab time to work on your images in Photoshop if you need/want help.

Tuesday, March 18, 2014

What to bring to class on Friday

David Hockney, Pear Blossom
Hope you had a great Spring Break!  Did you take any great pictures?  Are they on your blog?  Let me know and I'll go look.

We are now on the home stretch to finals.

Friday we will begin work on the David Hockney, Multiple Me, Levitation and Maggie Taylor assignment.


Please bring your:

  • camera, 
  • a tripod, 
  • card reader/cord to transfer pictures from your camera to the computer, 
  • large files of your alphabet images (not the ones you made smaller for the blog).
See you on Friday!


Levitation Example
Maggie Taylor

Multiple Me Example

Saturday, March 8, 2014

I found this to be inspiring....

What made Lauren Simonutti spend three and a half years, withdrawn from society, working alone in an initially dilapidated house that she converted—every corner, every nook, every stairway, used to stage frightening and preposterous and wonderful events—into a series of photographic tableaux?

http://art.newcity.com/2010/01/11/review-lauren-simonutticatherine-edelman-gallery/


Friday, March 7, 2014

Have a great Spring Break


Great job today on the mid-term critique. You worked hard and it showed. You don't have any home work over the break. Relax, enjoy and come back well rested.


You might want to consider entering your work into the student art show this Spring. It will need to be framed and perhaps matted. Just think about it.....

Saturday, March 1, 2014

Mid Term Critique is Friday, March 7 at 9am

Due:10 (ten) printed images size 8x12 with 1 inch white margins. Please put your full name on the back with a pencil. Also write what compositional tool you used for each of the 10 photographs on the back of each submission.

What: Shoot 10 different images using 10 different compositional tools. Below is the list of compositional tools you can choose from in order to create 10 final 8x12 images for the mid-term assignment:

1. Rule of Thirds
2. Filling the Frame
3. Framing
4. Dirty Framing
5. Silhoutte
6. Tunnel
7. Texture
8. Pattern
9. Leading Lines
10. Reflection
11. Shadows
12. Depth of Field (DOF)
13. Curved Lines (S Curve)
14. Meandering Lines
15. Diagonal Lines
16. Balance (Symetrical and Asymetrical)
17. Geometric Shapes
18. Fibonacci Ratio
19. Dynamic Symetry
20. Negative/Positive Space
21. Perspective
22. Sense of Scale
23. Rule of Odds
24. Stop Motion
25. Show Motion
26. Pan Motion
27. Cruciform
28. Sun Flare/ Star Burst

Things to consider: There are lots of students from all the other photography and VisCom classes printing their assignments for mid-term. Be sure to give yourself plenty of time to shoot and print. You can not be late for critique. Critique for your mid-term grade begins at 9 am sharp.

Don't Forget to email me your letters of the alphabet

Please don't forget to email me letters of your alphabet so that we can spell TAMU-C Art Department.

Email your letters to gsisco@yahoo.com.

About 2x2 jpegs or tiffs